SCIM provisioning
SCIM (System for Cross-domain Identity Management) lets your IdP automatically create, update, and deactivate Agility Credit users based on assignments and group memberships in your IdP. When SCIM is enabled, your IdP becomes the source of truth for user lifecycle and role assignment.
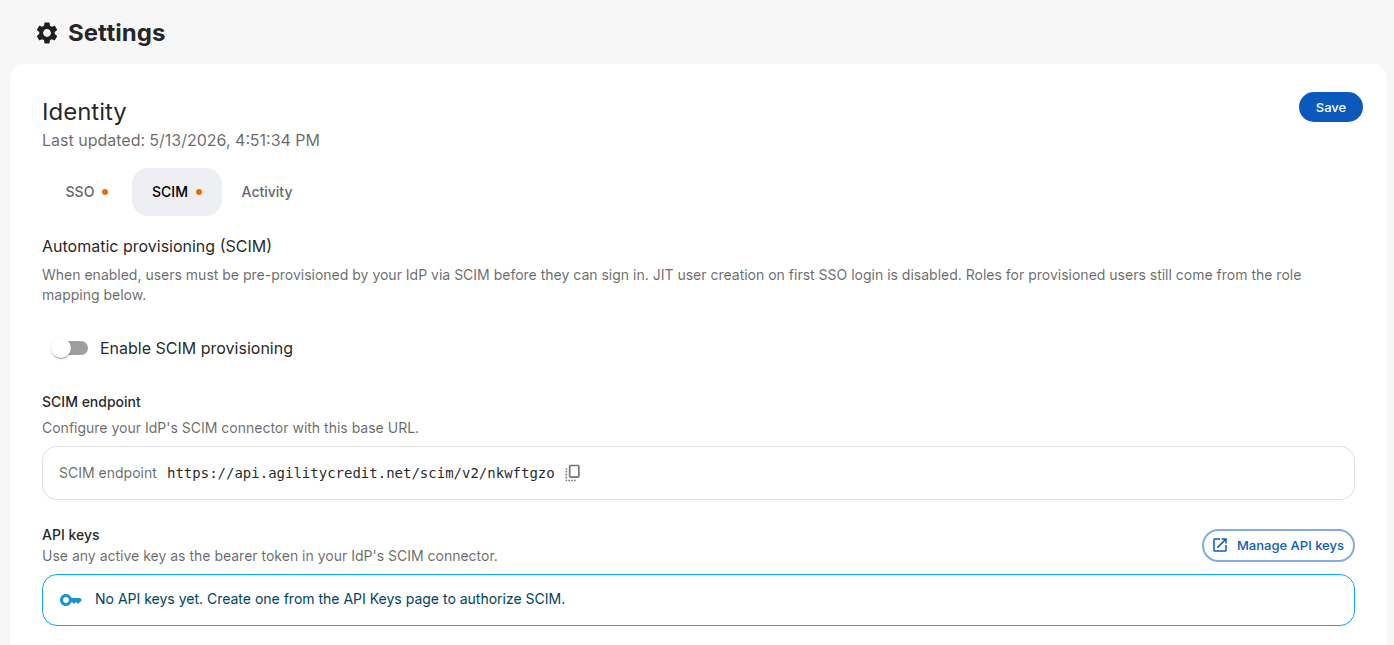
SCIM is configured under Settings → Account → Identity → SCIM.
When to use SCIM
Use SCIM if you want:
- Automatic provisioning — Users get an Agility account the moment they're assigned to the Agility app in your IdP.
- Automatic deprovisioning — Removing a user from the app or disabling them in your IdP locks them out of Agility.
- Group-driven roles — Role changes in your IdP flow through to Agility on the next sync, not on the next sign-in.
If you only need authentication, don't enable SCIM — just use SSO with role mapping. SCIM adds operational overhead and requires the user to exist in Agility before their first sign-in.
SCIM × SSO behavior
| Scenario | Without SCIM | With SCIM |
|---|---|---|
| New user signs in via SSO | Auto-created (JIT); roles from your role mapping | Sign-in rejected with scim_required_user_not_provisioned |
| Existing user signs in via SSO | Roles re-synced from role mapping every sign-in | Roles read from the SCIM-managed record; SSO mapping ignored |
| User removed in IdP | Account remains in Agility until manually deleted | Deprovisioned automatically on the next SCIM sync |
Supported IdPs
Agility's SCIM endpoint is SCIM 2.0–compliant and is officially supported with:
- Okta — using Okta's SCIM 2.0 provisioning
- Microsoft Entra ID — using Entra's SCIM provisioning
Other SCIM 2.0 clients may work — if your IdP sends a valid SCIM 2.0 bearer-authenticated payload, our endpoint will respond — but they are not officially tested or supported.
Enable SCIM
Step 1: Create an API key
SCIM authenticates using an Agility API key as a bearer token.
- In the portal, go to Settings → Account → API Keys.
- Click Create API key, give it a descriptive name (e.g.
Okta SCIM), and save. - Copy the full key value — Agility only displays it once.
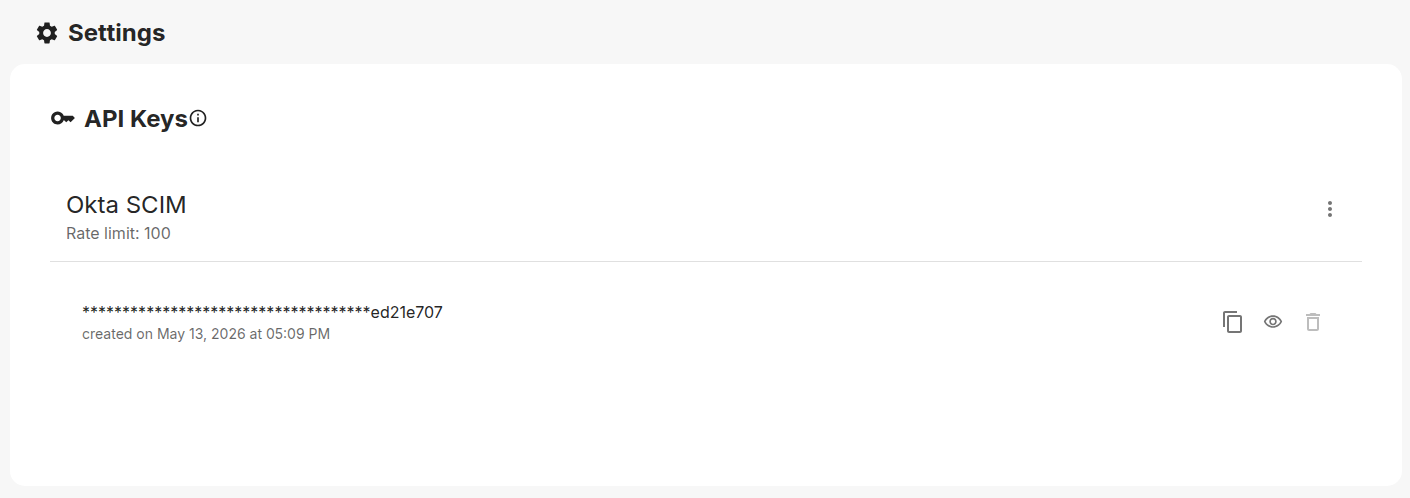
Create a separate API key for SCIM rather than reusing one used by other integrations. That way you can rotate it independently if your IdP credentials are compromised.
Step 2: Enable SCIM in Agility
-
Go to Settings → Account → Identity and open the SCIM tab.
-
Toggle Enable SCIM provisioning on.
-
Note the SCIM endpoint URL displayed in the page — it's of the form:
https://api.agilitycredit.net/scim/v2/<your-tenant-id>(UAT uses
https://api.agc-dev.com/scim/v2/<your-tenant-id>. The exact value for your tenant is shown in the portal with a copy button.) -
Click Save.
Step 3: Configure your IdP
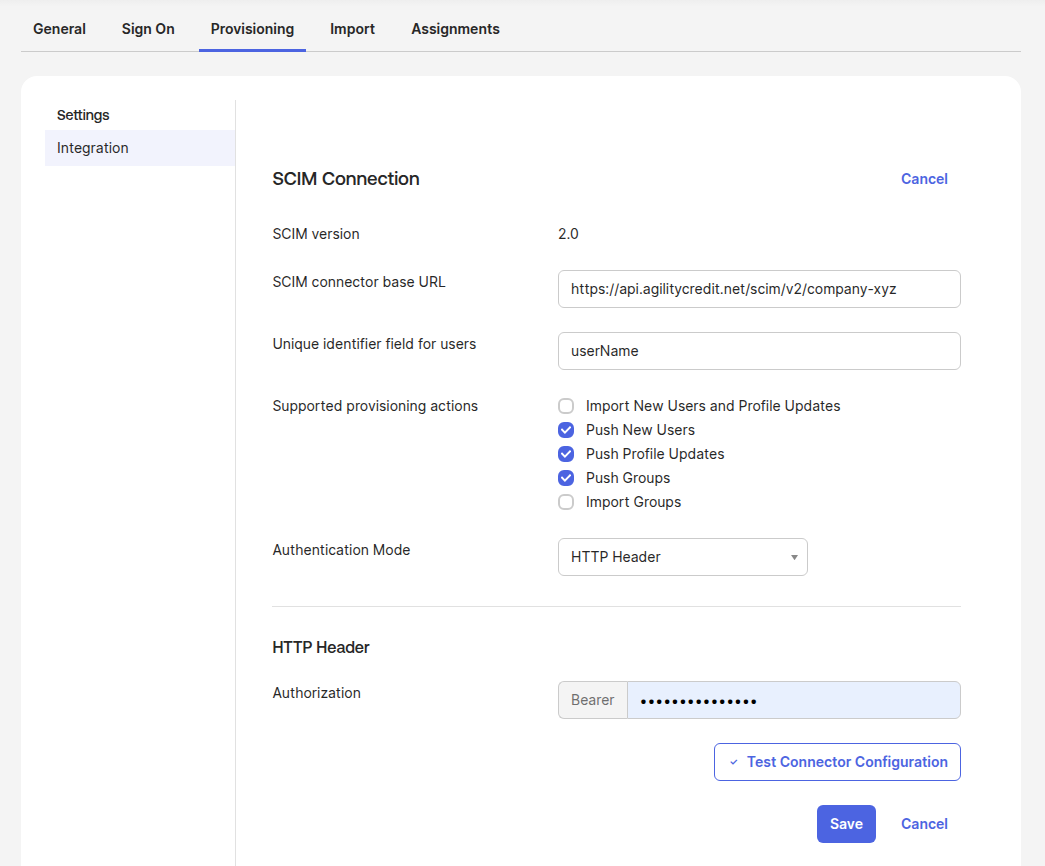
Okta
- In your Okta app, go to Provisioning → To App.
- Click Configure API Integration, check Enable API integration.
- Enter:
- Base URL: the SCIM endpoint from Agility
- Unique identifier field for users:
userName - Authentication Mode: HTTP Header
- Authorization: paste the API key from Step 1 (Okta uses this verbatim as the
Authorization: Bearer <key>header)
- Click Test API Credentials, then Save.
- Under Provisioning → To App → Provisioning Settings, enable the actions you need:
- Push New Users — create users in Agility when assigned in Okta
- Push Profile Updates — keep user attributes (name, email, phone) in sync
- Push Groups — sync Okta groups to Agility (required if you use From IdP groups role mapping with SCIM)
userName as the unique identifierAgility's SCIM endpoint matches users by the SCIM 2.0 standard userName. If you pick anything else (e.g. email or id), Okta can't reliably correlate the Okta user to the Agility record across attribute changes — every update will create a new duplicate user in Agility.
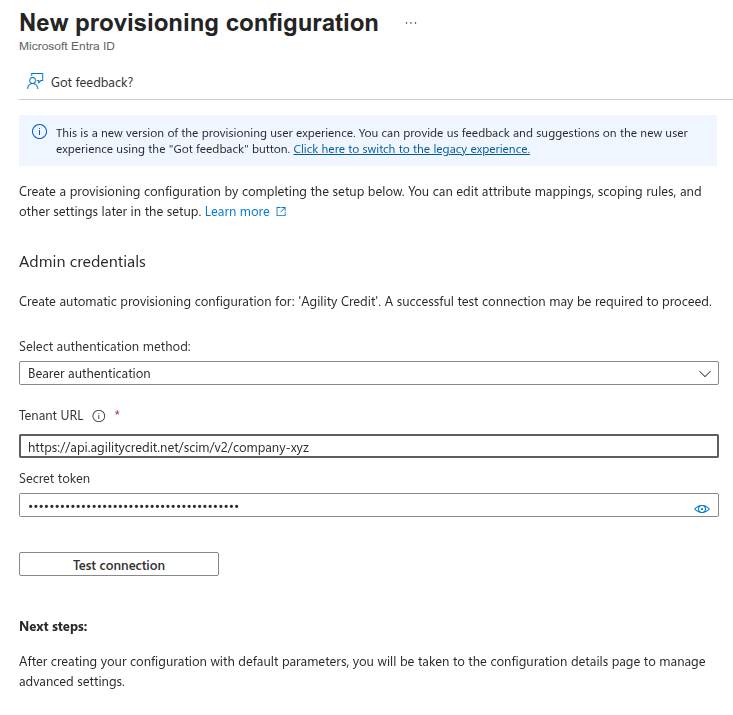
Entra ID
- In your Entra Enterprise Application, go to Provisioning.
- Set Provisioning Mode to Automatic.
- Under Admin Credentials, enter:
- Tenant URL: the SCIM endpoint from Agility
- Secret Token: the API key from Step 1
- Click Test Connection, then Save.
- Under Mappings, review and customize the attribute mappings if needed (the defaults work for most setups).
- Set Provisioning Status to On.
Recommended: provision roles via App Roles
If you're driving role assignment with App Roles (see Set up Entra ID), add one extra attribute mapping so Entra pushes role assignments through SCIM:
- In the Enterprise Application → Provisioning → Mappings, open Provision Microsoft Entra ID Users.
- Scroll to Attribute Mappings and click Add New Mapping.
- Configure:
- Mapping type: Expression
- Expression:
SingleAppRoleAssignment([appRoleAssignments]) - Target attribute:
roles[primary eq "true"].value - Match objects using this attribute: No
- Apply this mapping: Always
- Save.
(If users in your tenant need multiple concurrent app roles, use the expression AppRoleAssignmentsComplex([appRoleAssignments]) with the target attribute roles. SingleAppRoleAssignment is the common case.)
Without this mapping, app role assignments stay in Entra but aren't pushed to Agility — SCIM-provisioned users would arrive without roles. In Agility's role mapping, set Source to From IdP attribute and Attribute name to roles.
Step 4: Assign users and run the initial sync
- In your IdP, assign the users (and groups) you want provisioned.
- Trigger an initial sync — both Okta and Entra do this automatically once provisioning is on.
- In Agility, switch to the Activity tab and watch for
scim_provisionevents. Successful provisioning events appear with the user's email and an HTTP 201 status.
What gets synced
- Users — Email, given name, family name, active state
- Groups — Membership (used for role mapping if you've configured From IdP groups)
- Roles — Derived from SCIM data according to your role mapping configuration (see below)
Role mapping with SCIM
The same role mapping configuration applies to SCIM-provisioned users — but it runs at provisioning time, not at sign-in time. Pick one of:
- Portal-managed — SCIM does not update roles. Administrators set them in the Agility portal.
- From IdP groups — Roles derived from SCIM group memberships. Updates to group membership in your IdP flow through on the next sync.
- From IdP attribute — Roles derived from a configurable SCIM user attribute.
See Role mapping for full details.
Monitoring SCIM activity
The Activity tab on the Identity page shows recent SCIM operations:
scim_provision— User created or updatedscim_deprovision— User deactivatedscim_error— A SCIM request failed (with details)
Toggle Log successful events (debug) on to also record scim_read events, which include the full request and response payloads. Useful for diagnosing attribute mapping problems; disable it after go-live to keep the log readable.
Disabling SCIM
If you turn SCIM off:
- Existing user records stay in Agility — they aren't deleted.
- New SSO users start being JIT-created again on first sign-in.
- Roles are managed by role mapping on every SSO sign-in (or stay manual if you chose Portal-managed).
Troubleshooting
See the Troubleshooting page for common SCIM errors and how to read the activity log.