Set up Microsoft Entra ID
This guide walks through connecting Microsoft Entra ID (formerly Azure AD) as your SSO provider. Pick the protocol that fits your environment — SAML 2.0 or OIDC. You only need to set up one.
Before you begin, make sure you have:
- Entra administrator access (Application Administrator or Cloud Application Administrator role)
- Agility Credit administrator access for your tenant
- The list of Entra groups (or a user attribute) that should map to Agility roles
Pick a protocol
| SAML 2.0 | OIDC | |
|---|---|---|
| Setup complexity | Higher (certificates, claim mapping) | Lower (a few URLs) |
| Certificate rotation | Required (Entra rotates every 3 years by default) | Not applicable |
| Recommended when | Your security policy mandates SAML | You have no specific SAML requirement |
Option A — SAML 2.0
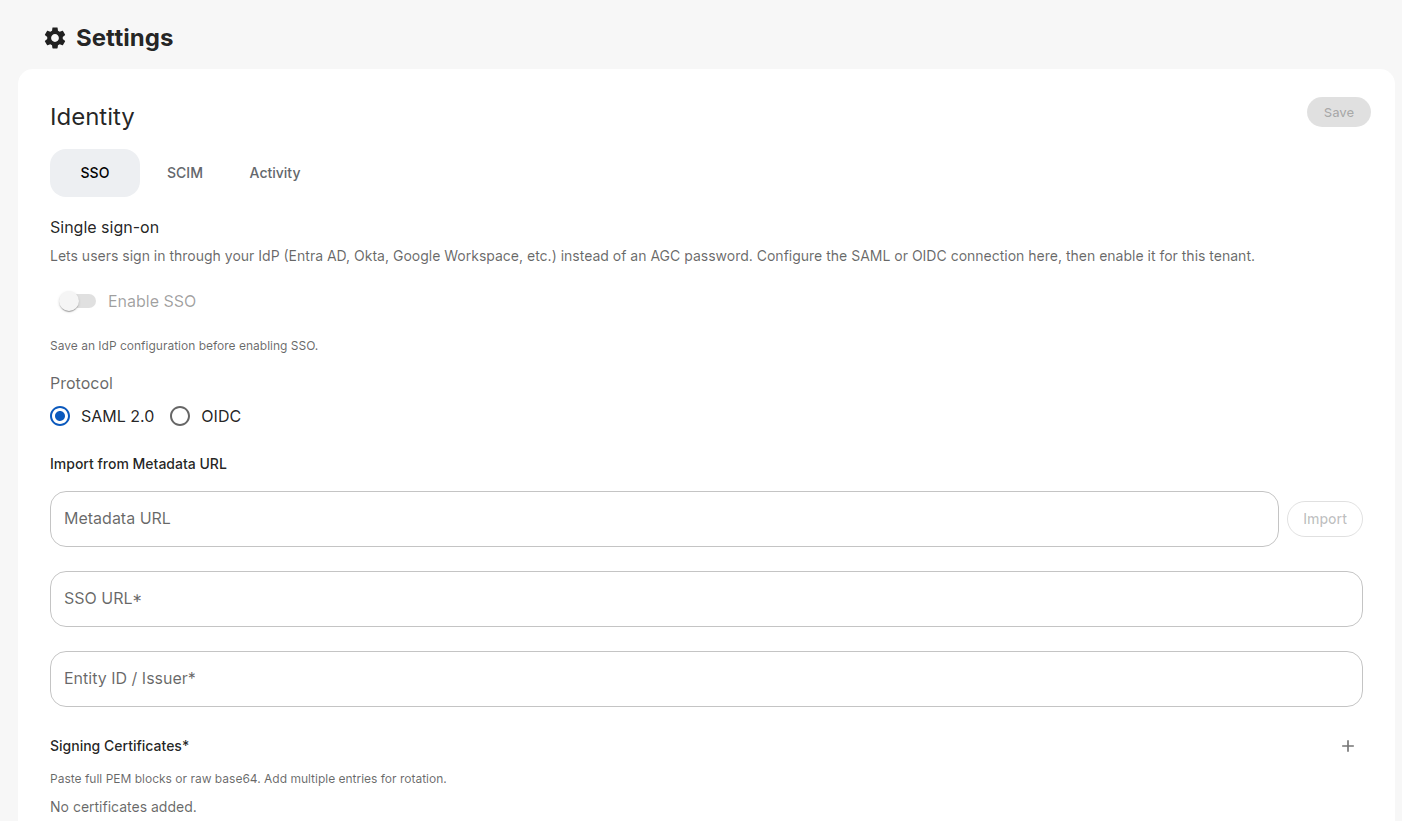
Step 1: Open the Identity page in Agility
- Sign in to the Agility Credit portal as an administrator.
- Open Settings → Account → Identity.
- On the SSO tab, choose SAML 2.0 as the protocol.
Keep this page open so you can copy values between the two consoles.
Step 2: Create the Enterprise Application in Entra
- Sign in to the Microsoft Entra admin center.
- Go to Entra ID → Enterprise applications.
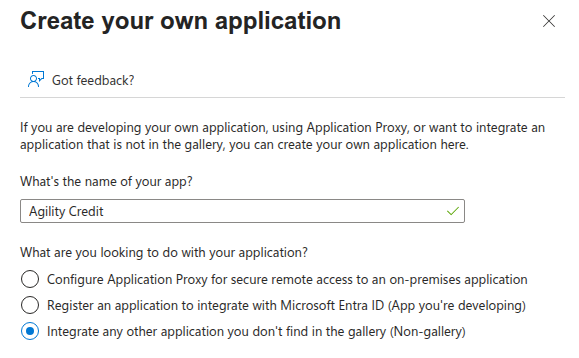
- Click New application, then Create your own application.
- Name it
Agility Credit, choose Integrate any other application you don't find in the gallery (Non-gallery), and click Create.
Step 3: Configure single sign-on
- In the new application, open Single sign-on from the left menu.
- Choose SAML as the SSO method.
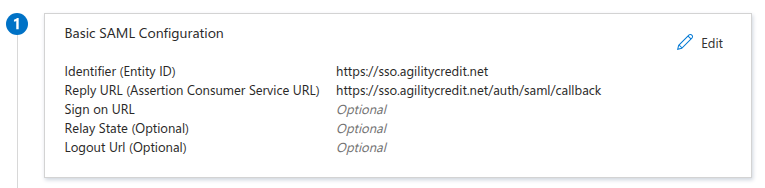
- In Basic SAML Configuration, click Edit and paste:
| Entra field | Value to paste |
|---|---|
| Identifier (Entity ID) | The SP Entity ID from Agility (e.g. https://sso.agilitycredit.net) |
| Reply URL (Assertion Consumer Service URL) | The ACS URL from Agility (e.g. https://sso.agilitycredit.net/auth/saml/callback) |
| Sign on URL | Leave blank |
| Relay State | Leave blank |
| Logout URL | Leave blank |
Click Save.
Step 4: Configure claims
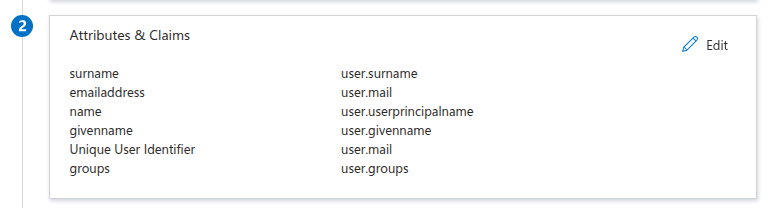
In the Attributes & Claims section, click Edit. Entra ships with a default set of claims; add or modify these so they match what Agility expects:
| Claim name | Source attribute |
|---|---|
emailaddress | user.mail (or user.userprincipalname if mail is empty) |
givenname | user.givenname |
surname | user.surname |
mobilephone | user.telephonenumber or user.mobile (optional) |
Set the Name identifier value (Name ID) to user.mail with format Email address.
The phone claim is optional — only add it if you want the user's phone number synced into Agility on sign-in.
Entra's default group claim emits group object IDs (GUIDs), which are hard to read and impossible to use with SCIM. App Roles let you define stable, readable role values that work consistently across SAML, OIDC, and SCIM.
- In your App registration (not the Enterprise Application — same app, different blade), open App roles.
- Click Create app role and add one app role per Agility role you want to grant — for example
Admin,User,UserWithCredit,Accounting,API. The Value field is what Entra sends to Agility; pick names you'll reference in your role mapping table. (Agility'sUser with Creditrole has spaces, but Entra App Role values can't contain spaces — use something likeUserWithCreditand map it through.) - Back in the Enterprise Application, open Users and groups, click Add user/group, and assign each user (or directory group) to a specific app role.
Entra emits the assigned app role in a roles claim automatically — no extra claim configuration required.
In Agility's role mapping, set the Source to From IdP attribute, Attribute name to roles, and map each Entra app role value to an Agility role — e.g. Admin → Admin, UserWithCredit → User with Credit, API → API.
If you prefer to drive role assignment from directory group membership instead of app roles, click Add a group claim in Attributes & Claims and configure:
- Which groups should be returned? — Groups assigned to the application (recommended) or Security groups.
- Source attribute — Cloud-only group display names for cloud-only Entra groups, or sAMAccountName for on-prem AD-synced groups. Avoid Group ID — it sends GUIDs that don't work with SCIM and are hard to read.
- Customize the name of the group claim — set Name to
groups.
Then in Agility, use From IdP groups role mapping. Note: display names are mutable — if a group is renamed in Entra, your role mapping silently breaks. App Roles avoid that risk.
Step 5: Set the signing option and copy URLs
In the SAML Certificates section, click the edit (pencil) icon at the top right of the section.
- Signing Option: change from the default Sign SAML response to Sign SAML response and assertion.
- Signing Algorithm: leave at SHA-256.
- Save.
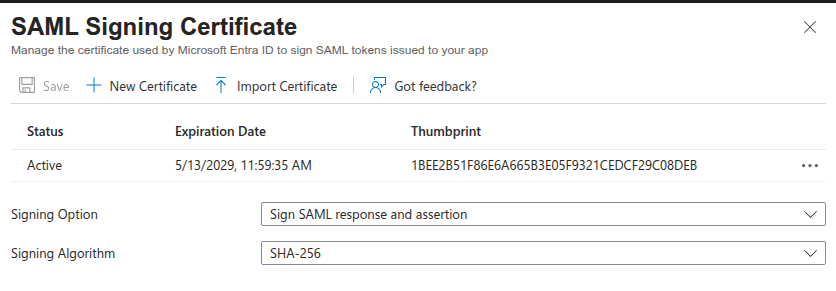
By default Entra signs only the outer SAML response, but Agility requires the assertion inside to be signed as well. If you skip this step, sign-in fails with SAML validation failed: Invalid document signature. This setting also follows Microsoft's own security guidance for SAML SSO.
Then, copy the Certificate (Base64) content from the same section. In the Set up Agility Credit section below, copy:
- App Federation Metadata URL (recommended — one URL, auto-updates on rotation), or
- Login URL and Microsoft Entra Identifier if you prefer to paste each value.
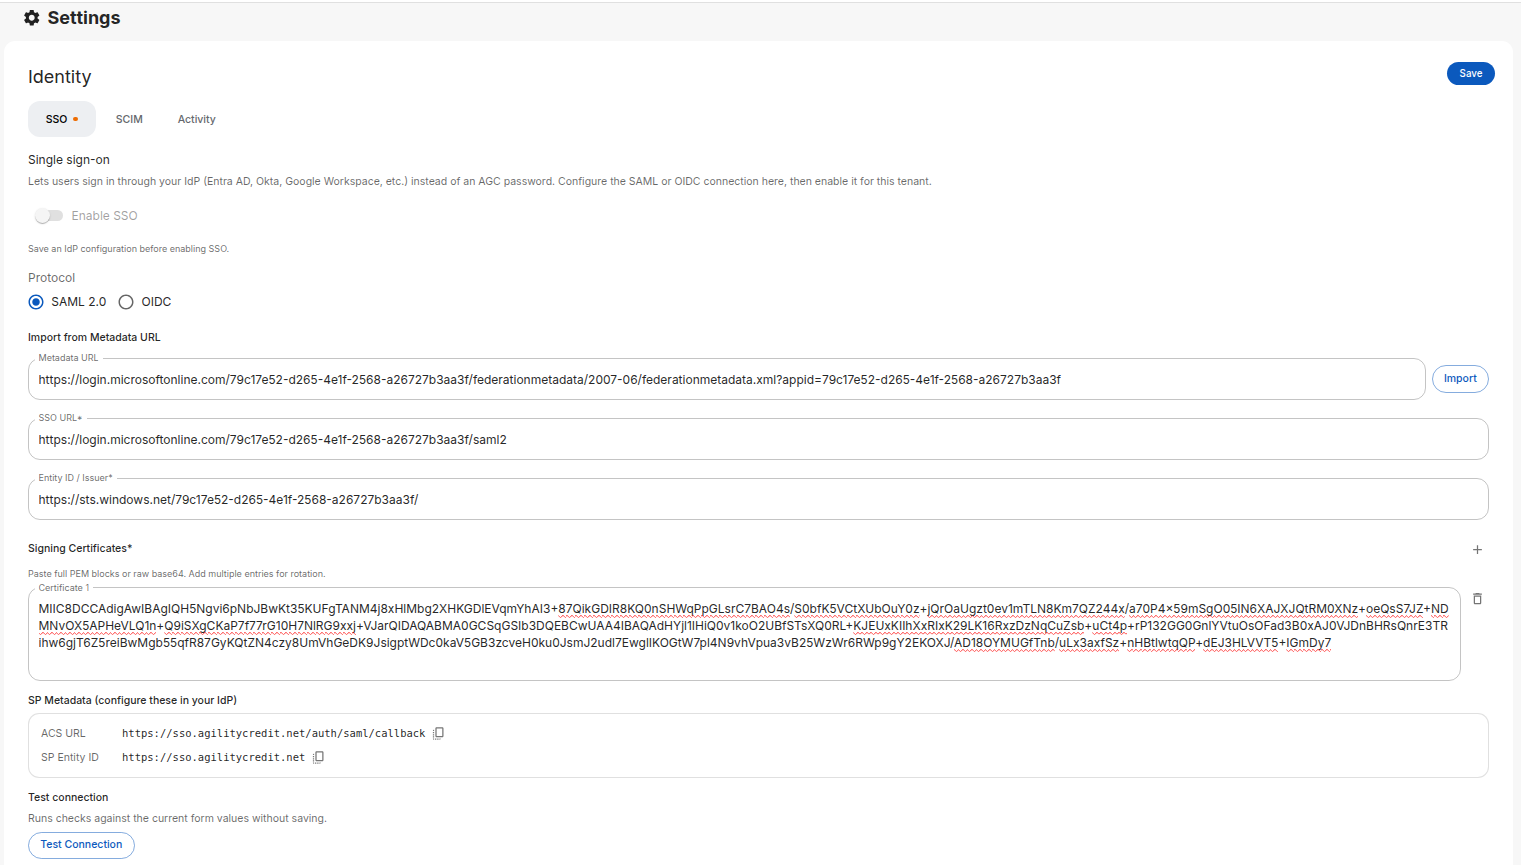
Step 6: Paste Entra's values into Agility
In the Agility Identity page:
- Paste the App Federation Metadata URL into the Metadata URL field and click Import. Agility will fetch the SSO URL, Entity ID, and signing certificate automatically.
- Or, if you prefer manual entry, paste the Login URL into SSO URL, the Microsoft Entra Identifier into Entity ID / Issuer, and the Base64 certificate into Signing Certificates.
Entra rotates SAML certificates periodically. You can paste both the current and the next certificate into Agility — both will be accepted at the same time. Add a second certificate using the + icon next to the certificate list before Entra activates the new one to avoid downtime.
Step 7: Assign users in Entra
In your Entra app, open Users and groups and assign the users (or groups) who should have access to Agility.
Step 8: Test and enable
- In Agility, click Test Connection to verify the configuration.
- Configure your role mapping.
- Toggle Enable SSO and click Save.
Entra's built-in test triggers an IdP-initiated flow that Agility doesn't accept — it returns Missing RelayState. This is by design: Agility only allows sign-ins that start from the Agility login page (SP-initiated), which is the flow your real users will take.
To test, open the Agility login page in a private/incognito window, click Login with SSO, and complete the flow from there.
Option B — OIDC
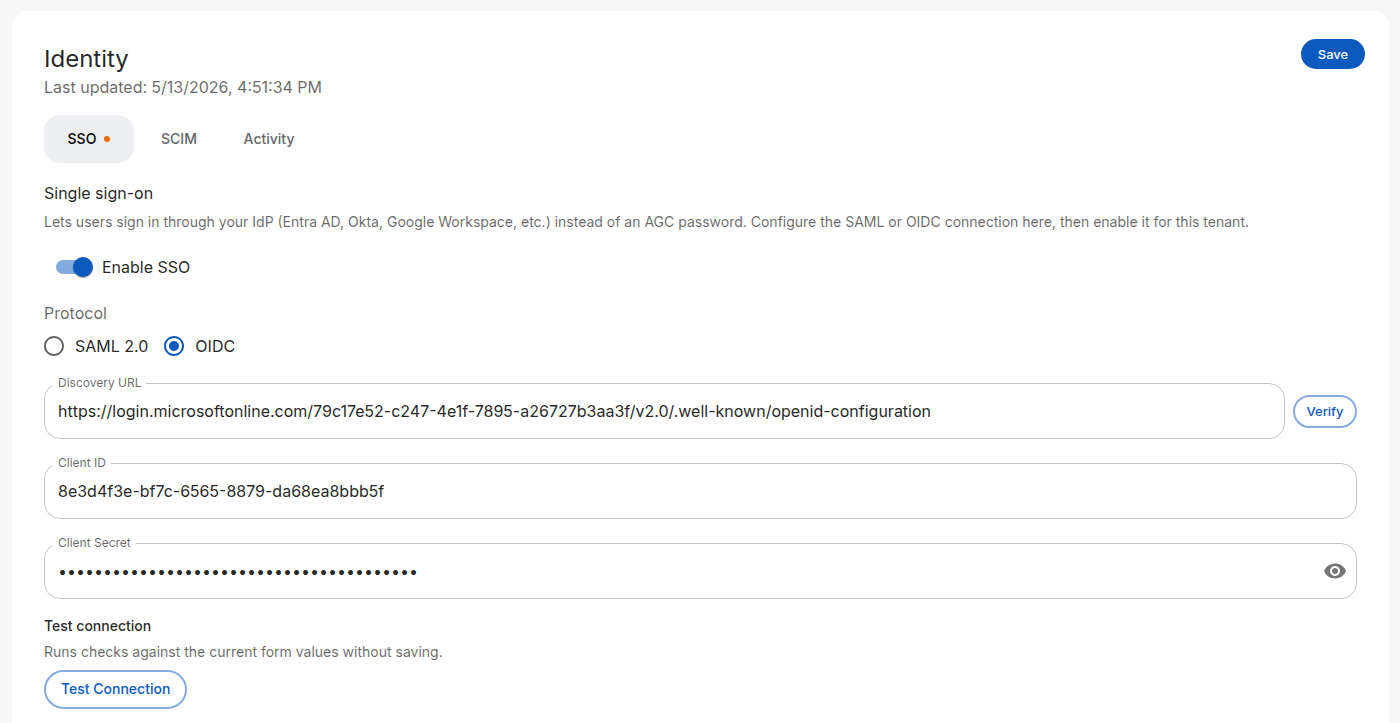
Step 1: Open the Identity page in Agility
- Sign in to the Agility Credit portal as an administrator.
- Open Settings → Account → Identity.
- On the SSO tab, choose OIDC as the protocol.
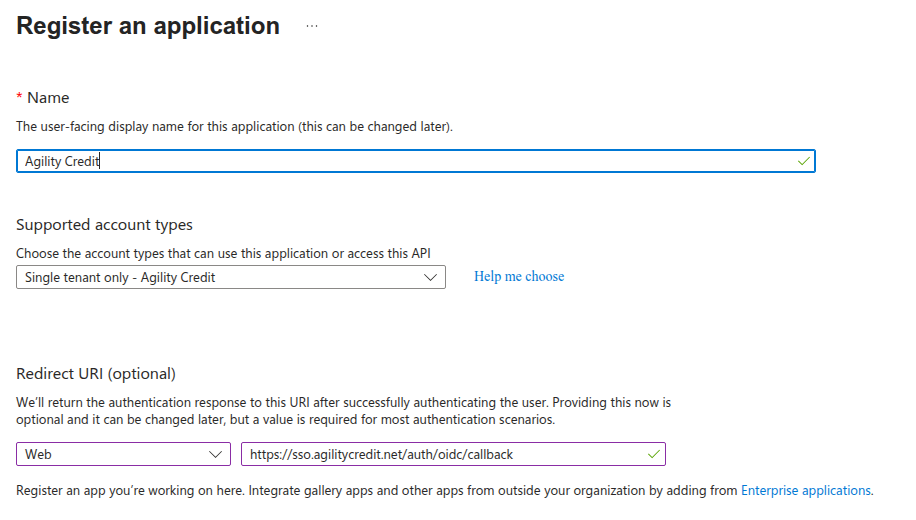
Step 2: Register an app in Entra
- Sign in to the Microsoft Entra admin center.
- Go to Identity → Applications → App registrations and click New registration.
- Fill out:
| Field | Value |
|---|---|
| Name | Agility Credit |
| Supported account types | Accounts in this organizational directory only (single tenant) |
| Redirect URI | Platform: Web — the OIDC Redirect URI from Agility (e.g. https://sso.agilitycredit.net/auth/oidc/callback) |
Click Register.
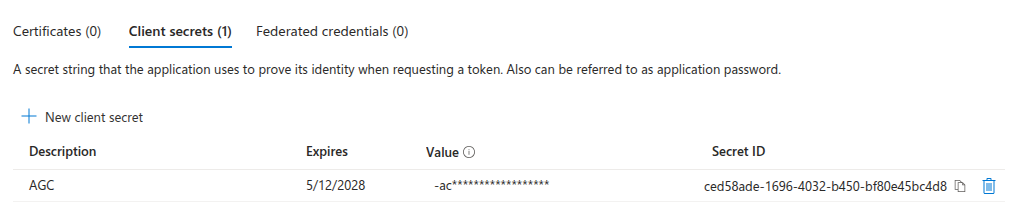
Step 3: Create a client secret
- In the registered app, open Certificates & secrets.
- Under Client secrets, click New client secret.
- Give it a description and an expiry, then click Add.
- Copy the secret value now — Entra only shows it once.
Step 4: Copy values to Agility
From the Entra app's Overview page:
| Entra value | Agility field |
|---|---|
| Discovery URL (see below for where to find it) | Discovery URL |
| Application (client) ID (see below) | Client ID |
| The client secret from Step 3 | Client Secret |
Entra doesn't display the OIDC discovery URL as a single labeled field — you either copy it from the Endpoints panel or assemble it from your tenant ID.
-
Recommended — copy from the Endpoints panel. On the app's Overview page, click the Endpoints button at the top. In the dialog, copy the OpenID Connect metadata document value. It's a complete URL of the form
https://login.microsoftonline.com/<tenant-id>/v2.0/.well-known/openid-configuration— paste that directly into Agility's Discovery URL field. -
Assemble manually. Copy the Directory (tenant) ID GUID from the app's Overview page (or from Entra ID → Overview), then build:
https://login.microsoftonline.com/<tenant-id>/v2.0/.well-known/openid-configurationMake sure to use the
v2.0/segment — Entra also exposes a v1.0 endpoint, but Agility expects the v2.0 token format.
On the same Overview page, find the Essentials panel near the top. The Application (client) ID is the GUID listed there (different from the Directory/tenant ID — Entra shows both). Copy it into Agility's Client ID field.
Click Verify next to the Discovery URL in Agility to confirm the document loads and shows your tenant's endpoints.
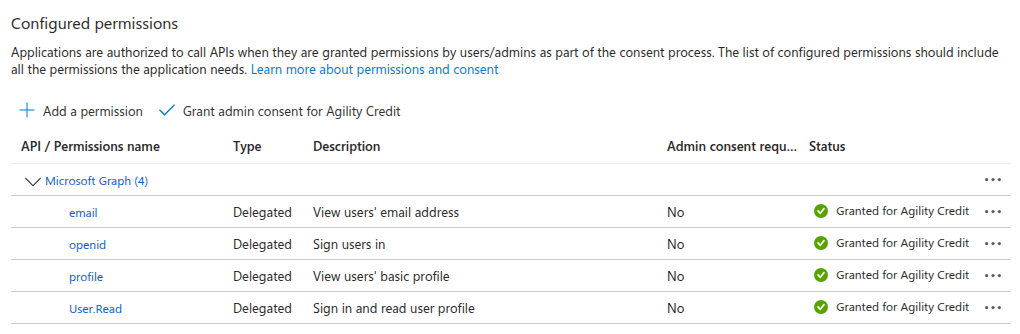
Step 5: Grant API permissions
By default, a new Entra app registration only has the User.Read permission. You need to add the OIDC scopes and grant admin consent — otherwise users see a consent prompt on first sign-in, and sign-in fails entirely in tenants that disable user consent.
- In the App registration, open API permissions from the left menu.
- Click Add a permission.
- Choose Microsoft Graph.
- Choose Delegated permissions.
- In the search box, find and check each of the following:
openidemailprofile
- Click Add permissions.
- Back on the API permissions page, click Grant admin consent for <your tenant> at the top of the permissions table. Confirm in the dialog.
After granting consent, the Status column should show a green check next to each permission.
Skipping admin consent makes sign-in fail in enterprise tenants that disable user-level consent (a common security policy). It also forces a per-user consent prompt on first login. Add the permissions and grant admin consent before going live.
Leave User.Read in place — it's harmless and Entra adds it by default.
Step 6: (Optional) Send the user's phone number
Entra does not return phone_number from the standard OIDC scopes. If you want phone numbers synced into Agility on sign-in, add an optional claim:
- In the App registration, open Token configuration.
- Click Add optional claim.
- Token type: ID.
- Select phone_number (or phone if
phone_numberisn't listed). - Click Add, then confirm the prompt to enable Microsoft Graph permissions if asked.
This step is optional — skip it if you don't need phone numbers in Agility.
Step 7: (Optional) Send role information
App Roles let you send stable, readable role values that work consistently across SAML, OIDC, and SCIM. The setup is the same as for SAML:
- In App registration → App roles, click Create app role and add one app role per Agility role you want to grant (e.g.
Admin,User,UserWithCredit,Accounting,API). The Value field is what Entra emits in the token. - In the Enterprise Application → Users and groups, assign each user (or directory group) to a specific app role.
Entra emits the assigned app role in a roles claim in the ID token automatically — no extra Token configuration required.
In Agility's role mapping, set Source to From IdP attribute, Attribute name to roles, and map each app role value to an Agility role.
If you prefer to drive role assignment from directory group membership instead of app roles:
- In the Entra app, open Token configuration.
- Click Add groups claim.
- Pick Groups assigned to the application (recommended) or Security groups.
- Under ID, select Cloud-only group display names for cloud-only Entra groups, or sAMAccountName for on-prem AD-synced groups. Avoid Group ID — it sends GUIDs that don't work with SCIM.
- Save.
Use From IdP groups role mapping in Agility. Note: display names are mutable — if a group is renamed in Entra, the mapping silently breaks. App Roles avoid that risk.
Step 8: Test and enable
- In Agility, click Test Connection.
- Configure your role mapping.
- Toggle Enable SSO and click Save.
What Entra needs to send
For both SAML and OIDC, Agility expects:
| Claim | Required | Notes |
|---|---|---|
email | Yes | Primary identifier for matching to existing Agility users |
given_name | Recommended | Used for the user's display name; empty if omitted |
family_name | Recommended | Used for the user's display name; empty if omitted |
phone_number | Optional | Synced into the user record on every sign-in if sent. Requires the Token-configuration step for OIDC. |
roles | Optional | Required for App-Roles-based role mapping (see Step 4 for SAML, Step 7 for OIDC) |
groups | Optional | Required only if you use From IdP groups role mapping |
For OIDC, Agility requests the scopes openid email profile phone. Entra ignores the phone scope — to ship phone numbers via OIDC, configure the optional claim in Token configuration (see the OIDC Step 6 above).
Next steps
- Role mapping — Map Entra groups or attributes to Agility roles
- SCIM provisioning — Auto-provision users from Entra via SCIM
- Troubleshooting — If sign-in fails after configuration