Set up Okta
This guide walks through connecting Okta as your SSO provider. Pick the protocol that fits your environment — SAML 2.0 or OIDC. You only need to set up one.
Before you begin, make sure you have:
- Okta administrator access
- Agility Credit administrator access for your tenant
- The list of Okta groups (or a user attribute) that should map to Agility roles
Pick a protocol
| SAML 2.0 | OIDC | |
|---|---|---|
| Setup complexity | Higher (certificates, attribute statements) | Lower (a few URLs) |
| Certificate rotation | Required | Not applicable |
| Recommended when | Your security policy mandates SAML | You have no specific SAML requirement |
Option A — SAML 2.0
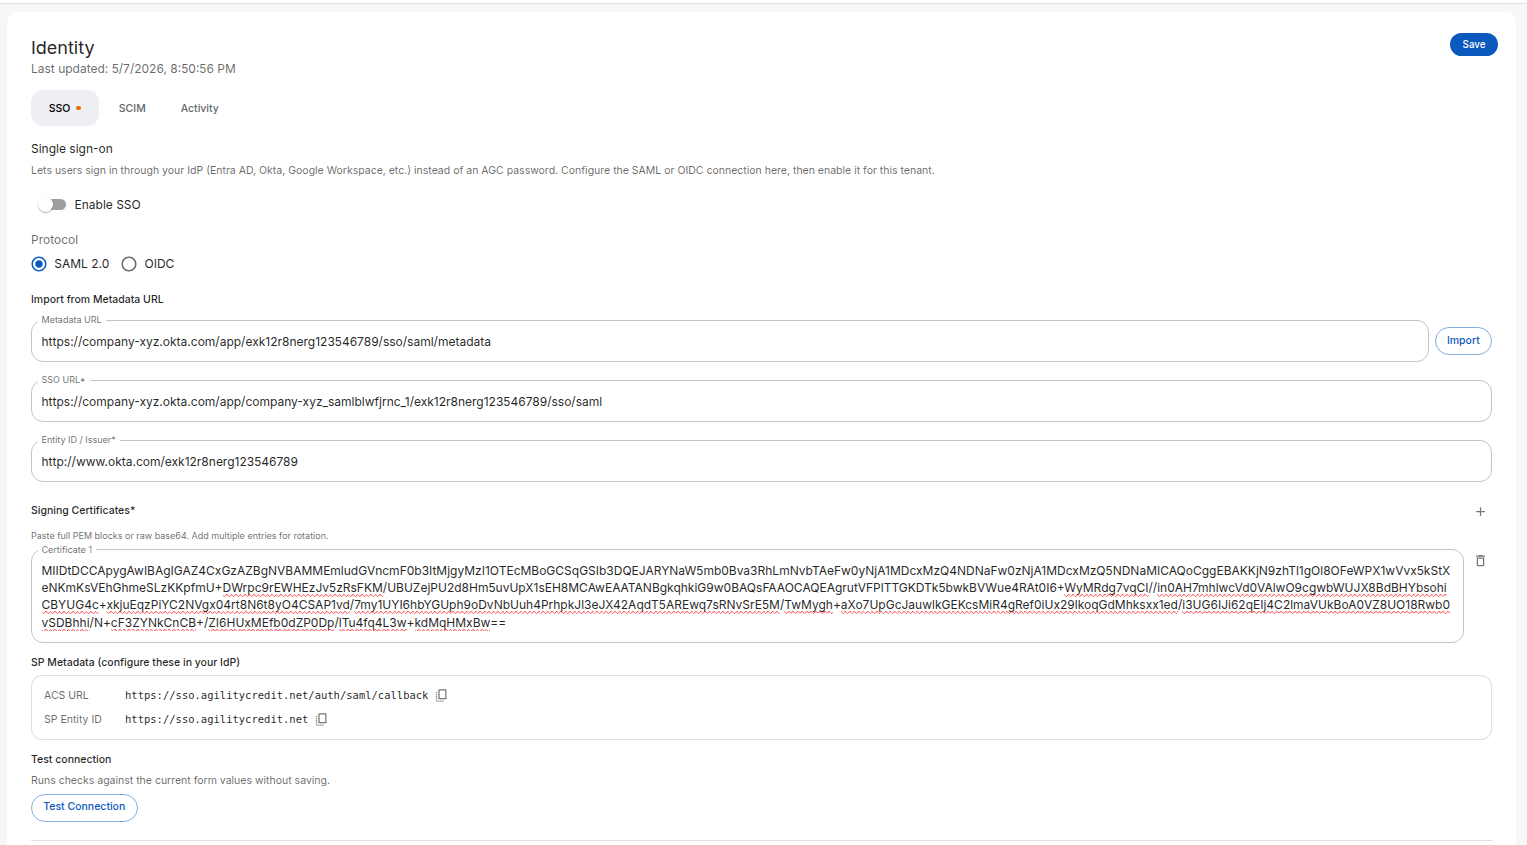
Step 1: Open the Identity page in Agility
- Sign in to the Agility Credit portal as an administrator.
- Open Settings from the main navigation.
- Select Account, then Identity.
- On the SSO tab, choose SAML 2.0 as the protocol.
Keep this page open — you'll copy values from the SP Metadata panel into Okta, and then come back to paste Okta's values here.
Step 2: Create the SAML app in Okta
- Sign in to your Okta admin console.
- Go to Applications → Applications, then click Create App Integration.
- Choose SAML 2.0 and click Next.
- Set App name to
Agility Credit(or your preferred label) and click Next.
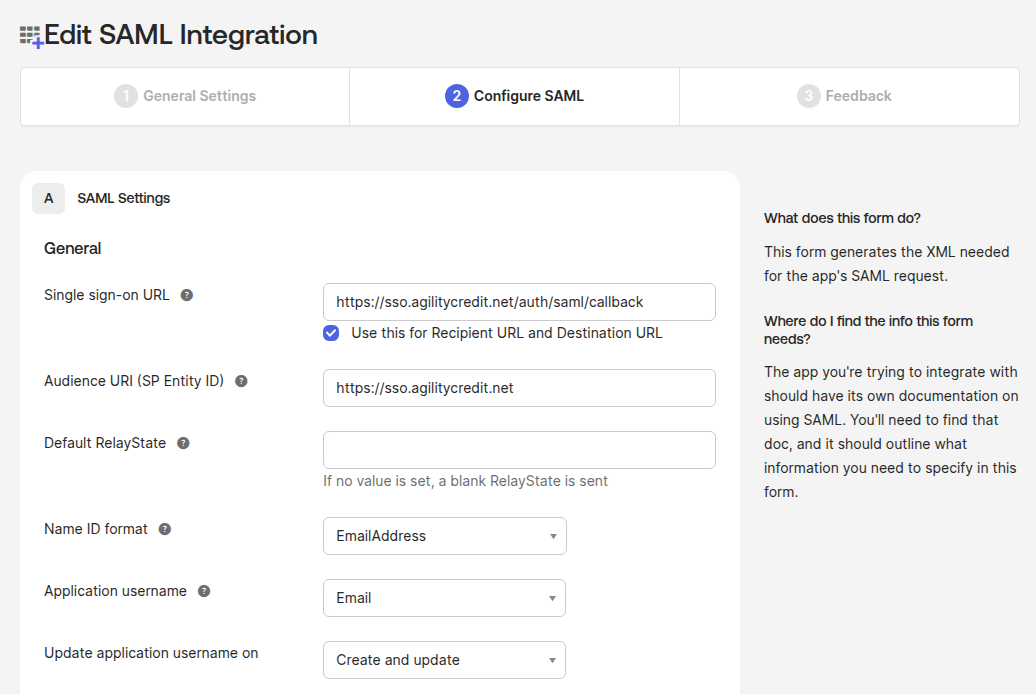
Step 3: Configure SAML settings in Okta
From the SP Metadata panel in Agility, copy these values into Okta:
| Okta field | Value to paste |
|---|---|
| Single sign-on URL | The ACS URL from Agility (e.g. https://sso.agilitycredit.net/auth/saml/callback) |
| Use this for Recipient URL and Destination URL | Checked |
| Audience URI (SP Entity ID) | The SP Entity ID from Agility (e.g. https://sso.agilitycredit.net) |
| Name ID format | EmailAddress |
| Application username | Email |
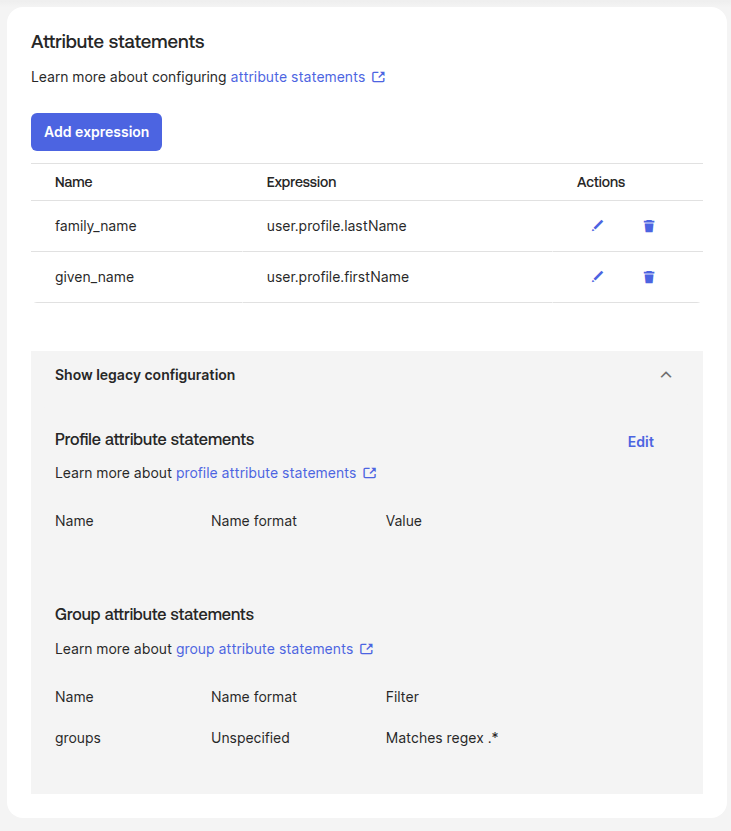
Step 4: Add attribute statements
Under Attribute Statements, add the following. Agility uses these claims to populate the user record.
| Name | Value |
|---|---|
given_name | user.profile.firstName |
family_name | user.profile.lastName |
phone_number | user.profile.mobilePhone |
For given_name, family_name, and phone_number, use Okta's expression syntax (user.profile.firstName etc.) rather than the older shorthand. phone_number is optional — only add it if you want the user's phone to be synced into Agility on sign-in.
Under Group Attribute Statements (optional, only needed if you use From IdP groups role mapping) — this section uses Okta's legacy group-claim configuration, which is still the supported path for SAML group statements:
| Name | Name format | Filter |
|---|---|---|
groups | Unspecified | Matches regex .* (or a narrower filter for the groups you want to send) |
Click Next, fill out the feedback form, then Finish.
Step 5: Copy Okta's SAML details back to Agility
- In the Okta app, open the Sign On tab.
- Find the Metadata URL (sometimes labeled "Identity Provider metadata"). Copy it.
- Back in the Agility Identity page:
- Paste the URL into Metadata URL and click Import. Agility will fetch and fill the SSO URL, Entity ID, and signing certificate automatically.
- Or, if you prefer to fill manually, copy the Identity Provider Single Sign-On URL, Identity Provider Issuer, and X.509 Certificate from Okta into the corresponding fields.
Step 6: Assign users in Okta
In your Okta app, go to Assignments and assign the users (or groups) who should have access to Agility.
Step 7: Test and enable
- Back in Agility, click Test Connection to verify the configuration.
- Configure your role mapping.
- Toggle Enable SSO at the top of the page.
- Click Save.
Users in the assigned Okta groups can now sign in via the Login with SSO button on the Agility login page.
Okta's app-level test (the Sign On → Test option) and the "tile launch" from a user's Okta dashboard trigger an IdP-initiated flow that Agility doesn't accept — it returns Missing RelayState. This is by design: Agility only allows sign-ins that start from the Agility login page (SP-initiated), which is the flow your real users will take.
To test, open the Agility login page in a private/incognito window, click Login with SSO, and complete the flow from there.
Option B — OIDC
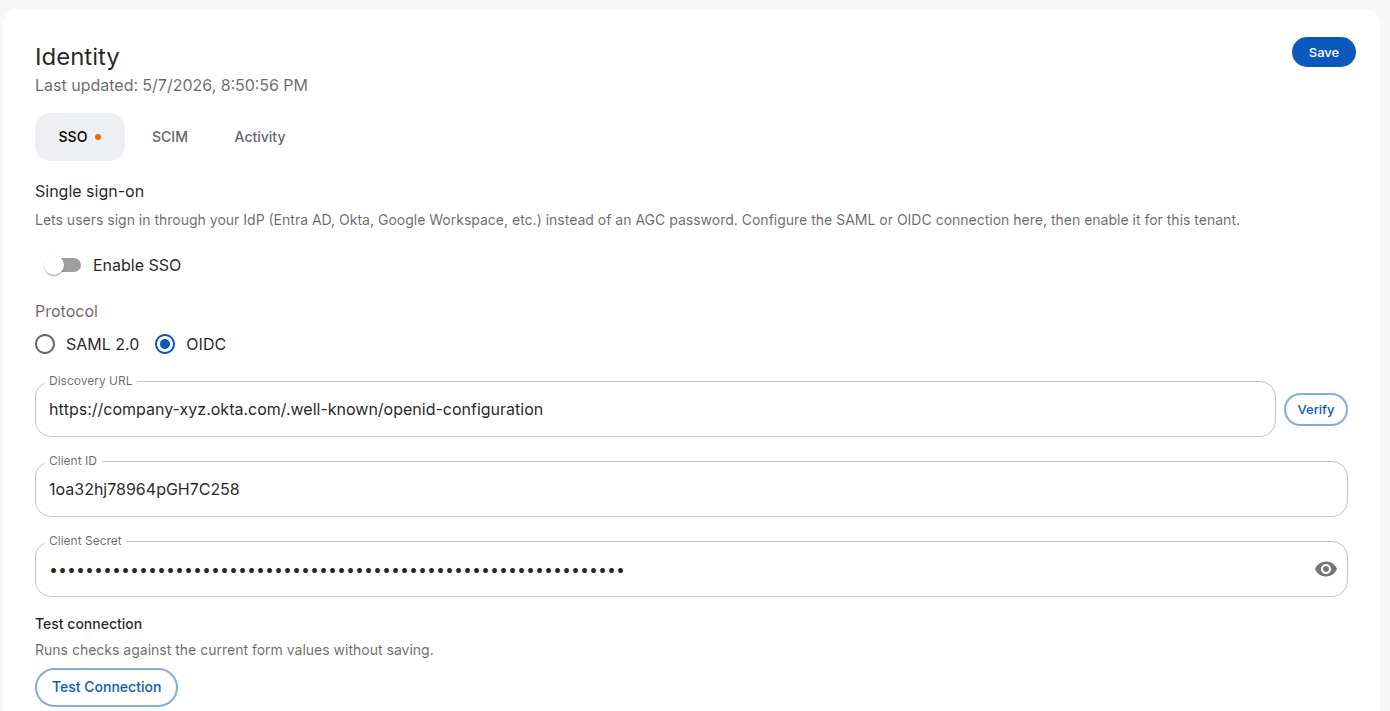
Step 1: Open the Identity page in Agility
- Sign in to the Agility Credit portal as an administrator.
- Open Settings → Account → Identity.
- On the SSO tab, choose OIDC as the protocol.
Keep this page open — the Redirect URI panel at the bottom shows the value you'll paste into Okta in Step 3.
Step 2: Create the OIDC app in Okta
- Sign in to your Okta admin console.
- Go to Applications → Applications, then click Create App Integration.
- Choose OIDC - OpenID Connect.
- Set Application type to Web Application and click Next.

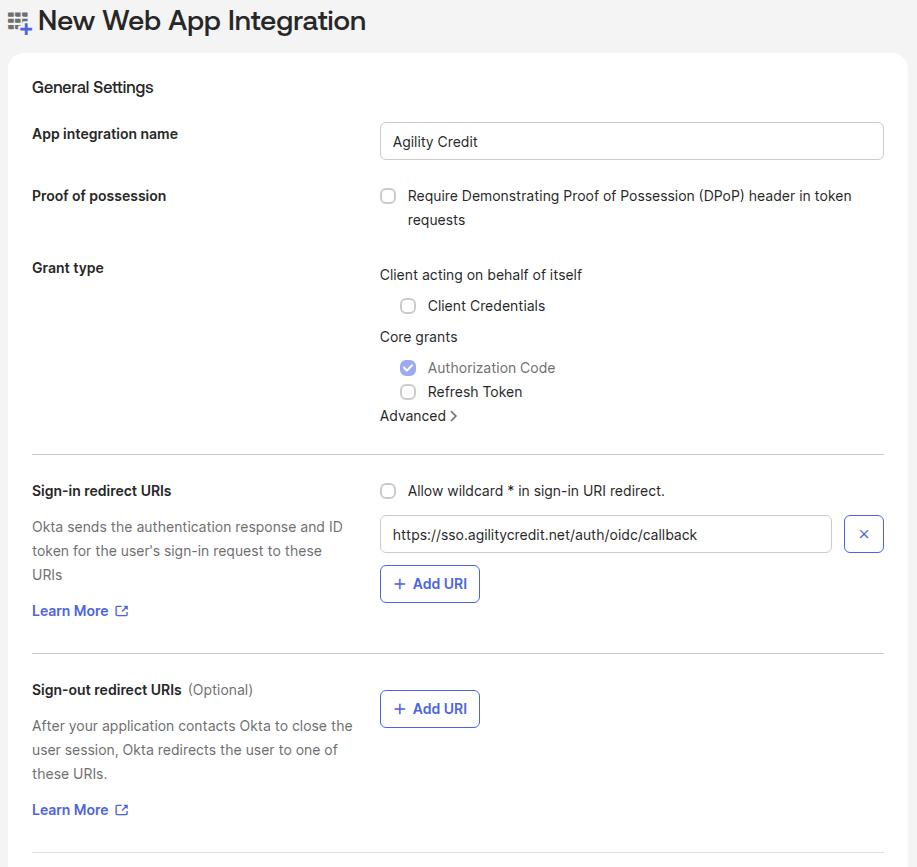
Step 3: Configure the OIDC app
Fill in the Okta form:
| Okta field | Value |
|---|---|
| App integration name | Agility Credit |
| Grant type | Authorization Code |
| Sign-in redirect URIs | The OIDC Redirect URI from Agility (e.g. https://sso.agilitycredit.net/auth/oidc/callback) |
| Sign-out redirect URIs | Leave blank or set to your portal URL |
| Controlled access | Choose who can access the app |
Click Save.
Step 4: Copy Okta credentials to Agility
From the Okta app's General tab, copy:
| Okta value | Agility field |
|---|---|
Okta domain + /.well-known/openid-configuration (e.g. https://your-org.okta.com/.well-known/openid-configuration) | Discovery URL |
| Client ID | Client ID |
| Client Secret | Client Secret |
Click Verify next to the Discovery URL — Agility will fetch the document and show the resolved issuer, authorization endpoint, and token endpoint. This catches typos before you save.
Step 5: Assign users and test
- In Okta, go to Assignments and assign users or groups.
- In Agility, click Test Connection.
- Configure your role mapping.
- Toggle Enable SSO and click Save.
What Okta needs to send
For both SAML and OIDC, Agility expects the following claims:
| Claim | Required | Notes |
|---|---|---|
email | Yes | Primary identifier for matching to existing Agility users |
given_name | Recommended | Used for the user's display name; empty if omitted |
family_name | Recommended | Used for the user's display name; empty if omitted |
phone_number | Optional | Synced into the user record on every sign-in if sent |
groups | Optional | Required only if you use From IdP groups role mapping |
roles | Optional | Required only if you use From IdP attribute role mapping with name roles |
For OIDC, Agility requests the scopes openid email profile phone. Okta returns phone_number automatically under the phone scope — no extra configuration needed on the Okta side.
Next steps
- Role mapping — Map Okta groups or attributes to Agility roles
- SCIM provisioning — Auto-provision users from Okta via SCIM
- Troubleshooting — If sign-in fails after configuration